Enabling a Reproducible Data Experimentation Environment
Table of Contents
This post is going to detail how I enabled reproducible environments
- Reproducible Docker Builds
- Optimizing Data Transfers
Enabled reproducible data analysis by leveraging DVC to capture data lineage, provisioning both object storage and IAM policies using Terraform for secure access, optimizing network transfers by 35x and packaging notebooks via Docker
In this figure, the developer utilizes four main command line tools: DVC, Git, Poetry and Docker. DVC is configured to pull and push dataset artifacts onto the DVC repository.
Docker Build Flow
Initial Idea
An interesting use case for Docker is for packaging and running Jupyter Notebook Environments.
That is, we can use Docker to commit the image to an artifact store, save the notebook as is and anyone within your organization can pull that down and run it. This is a massive boost for sharing and reproducing scientific experimentations. In the case of a Data team, this empowers individual contributers get feedback quicker and for teams to move understanding up the chain of the organization.
organization on docker, to push images. hands on docker. link on notion.
git-lfs or datasets. s3 location to sync a dataset down. dvc is another option for tooling.
Reproducible Experimentation Environment Design
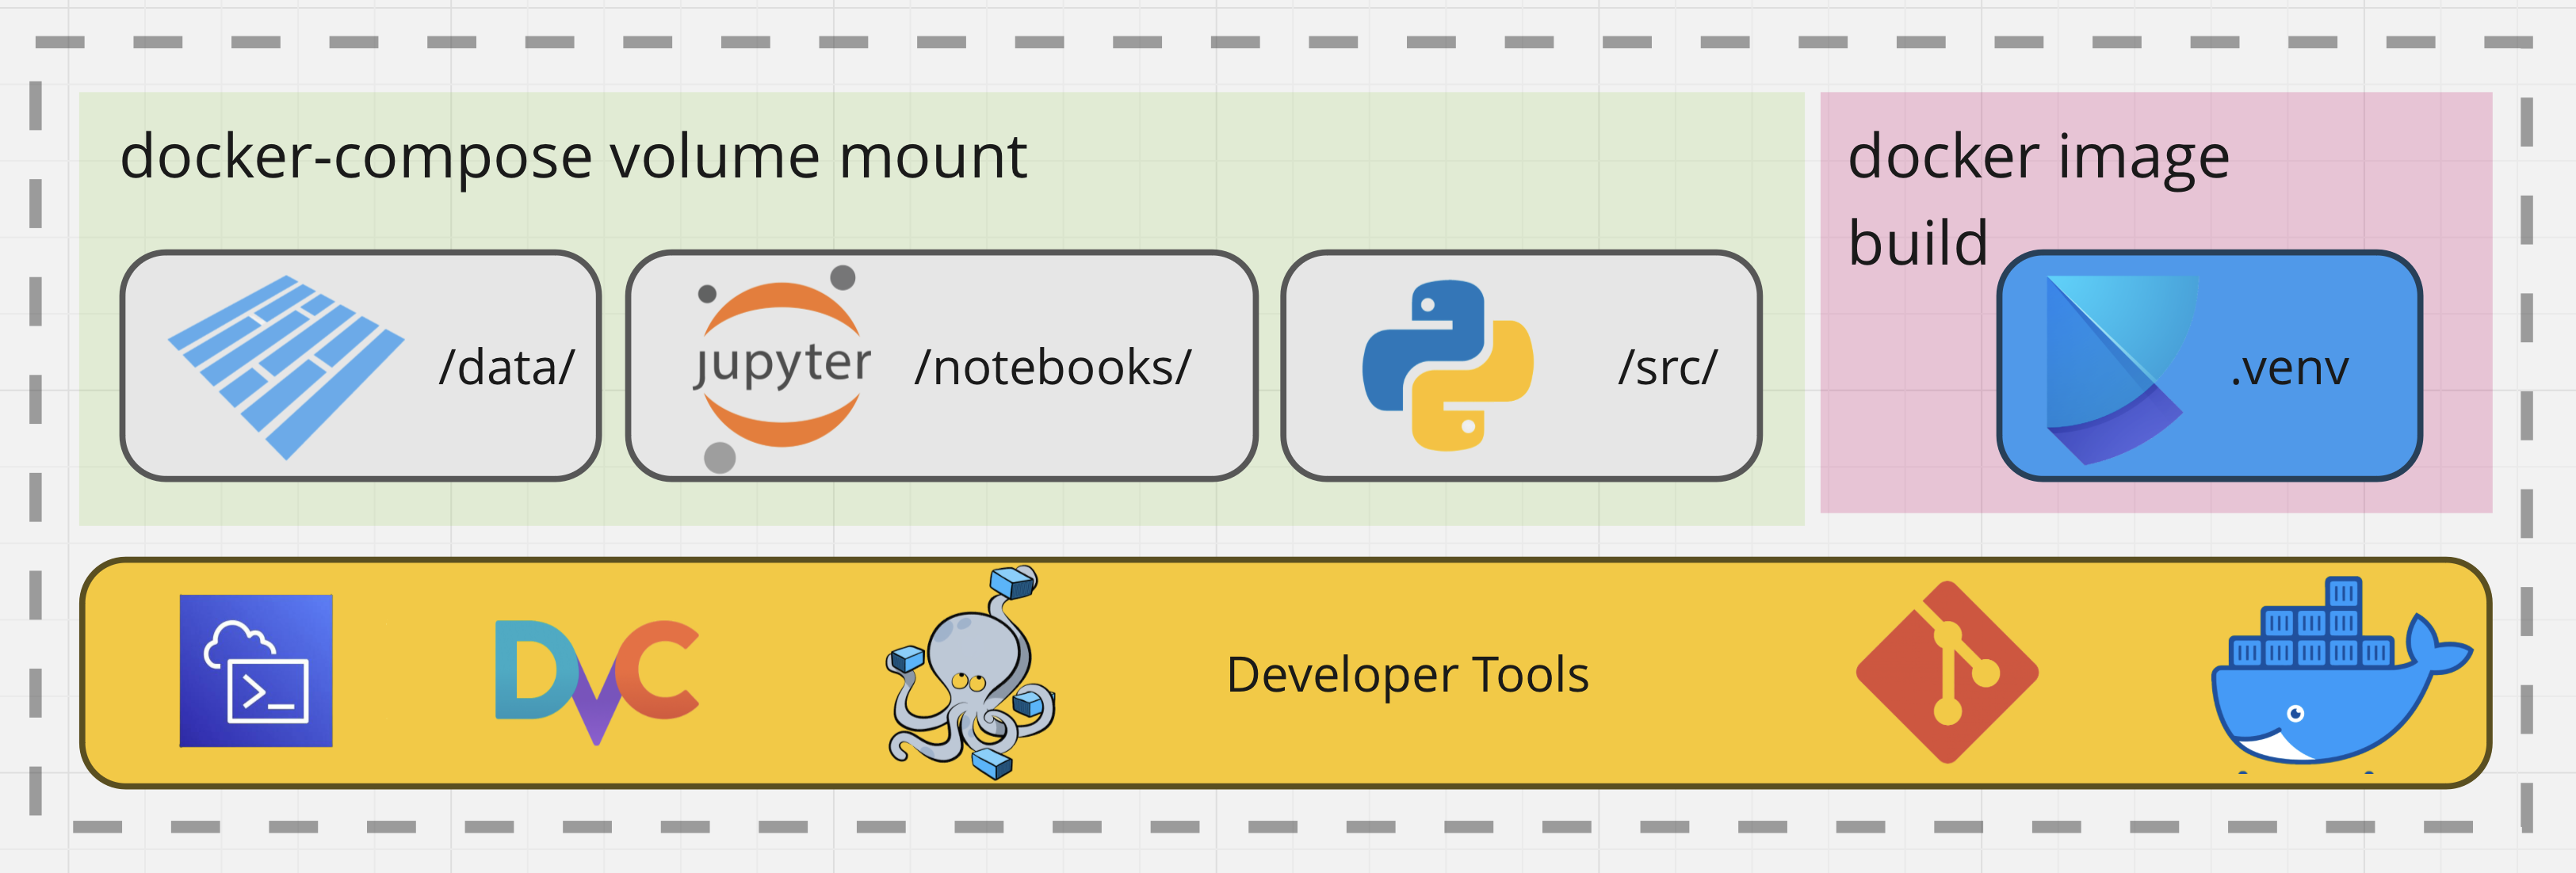
Figure 1. The Tooling Used in the Notebook Workflow.
In this figure, we encapsulate the main concepts in this design – Data would be versioned with DVC and authentication would be required to upload or download the data artifacts using AWS. For now, lets gloss over those details and focus on the Docker image build. I made great use of Docker for image building and docker-compose for mounting my file system into the running container for quick iteration
So far, we got a github workflow deployed to Dockerhub, for the base jupyter server environment. Plan is to have multistage builds, that extend that base image. Next, we pass in variables to define the data dependencies for each of these in their own docker-compose file. This will include stuff like the notebook name + data.
Environment Packaging with Poetry
For me the choice of package manager was simple. Poetry fit that role, due to pyproject.toml providing great project structure and for its virtual environment capabilities.
Poetry allows one to easily manage project’s dependencies. This ensures that code always has the correct versions of libraries. Furthermore, Poetry provides an isolated environment for Python.
Why use Docker and Poetry
Since there can be difficulties when trying to use non-Python dependencies in Poetry, I used Docker to circumvent that pitfall. Docker images provide a consistent environment ensuring the Jupyter Environment behaves the same each time. In addition to helping a ton with reproducibility, Docker simplifies the process of packaging and shipping our environment. This was critical for collaboration. We opted for storing our images onto DockerHub.
Building a Jupyter Server Environment with Multi-Stage Builds
Using Docker, I packaged the environment with a Docker Multi-Stage build. Additionally, this process is performed using the Github Workflow framework for automating jobs. The jobs are trigger by changes to the repository.
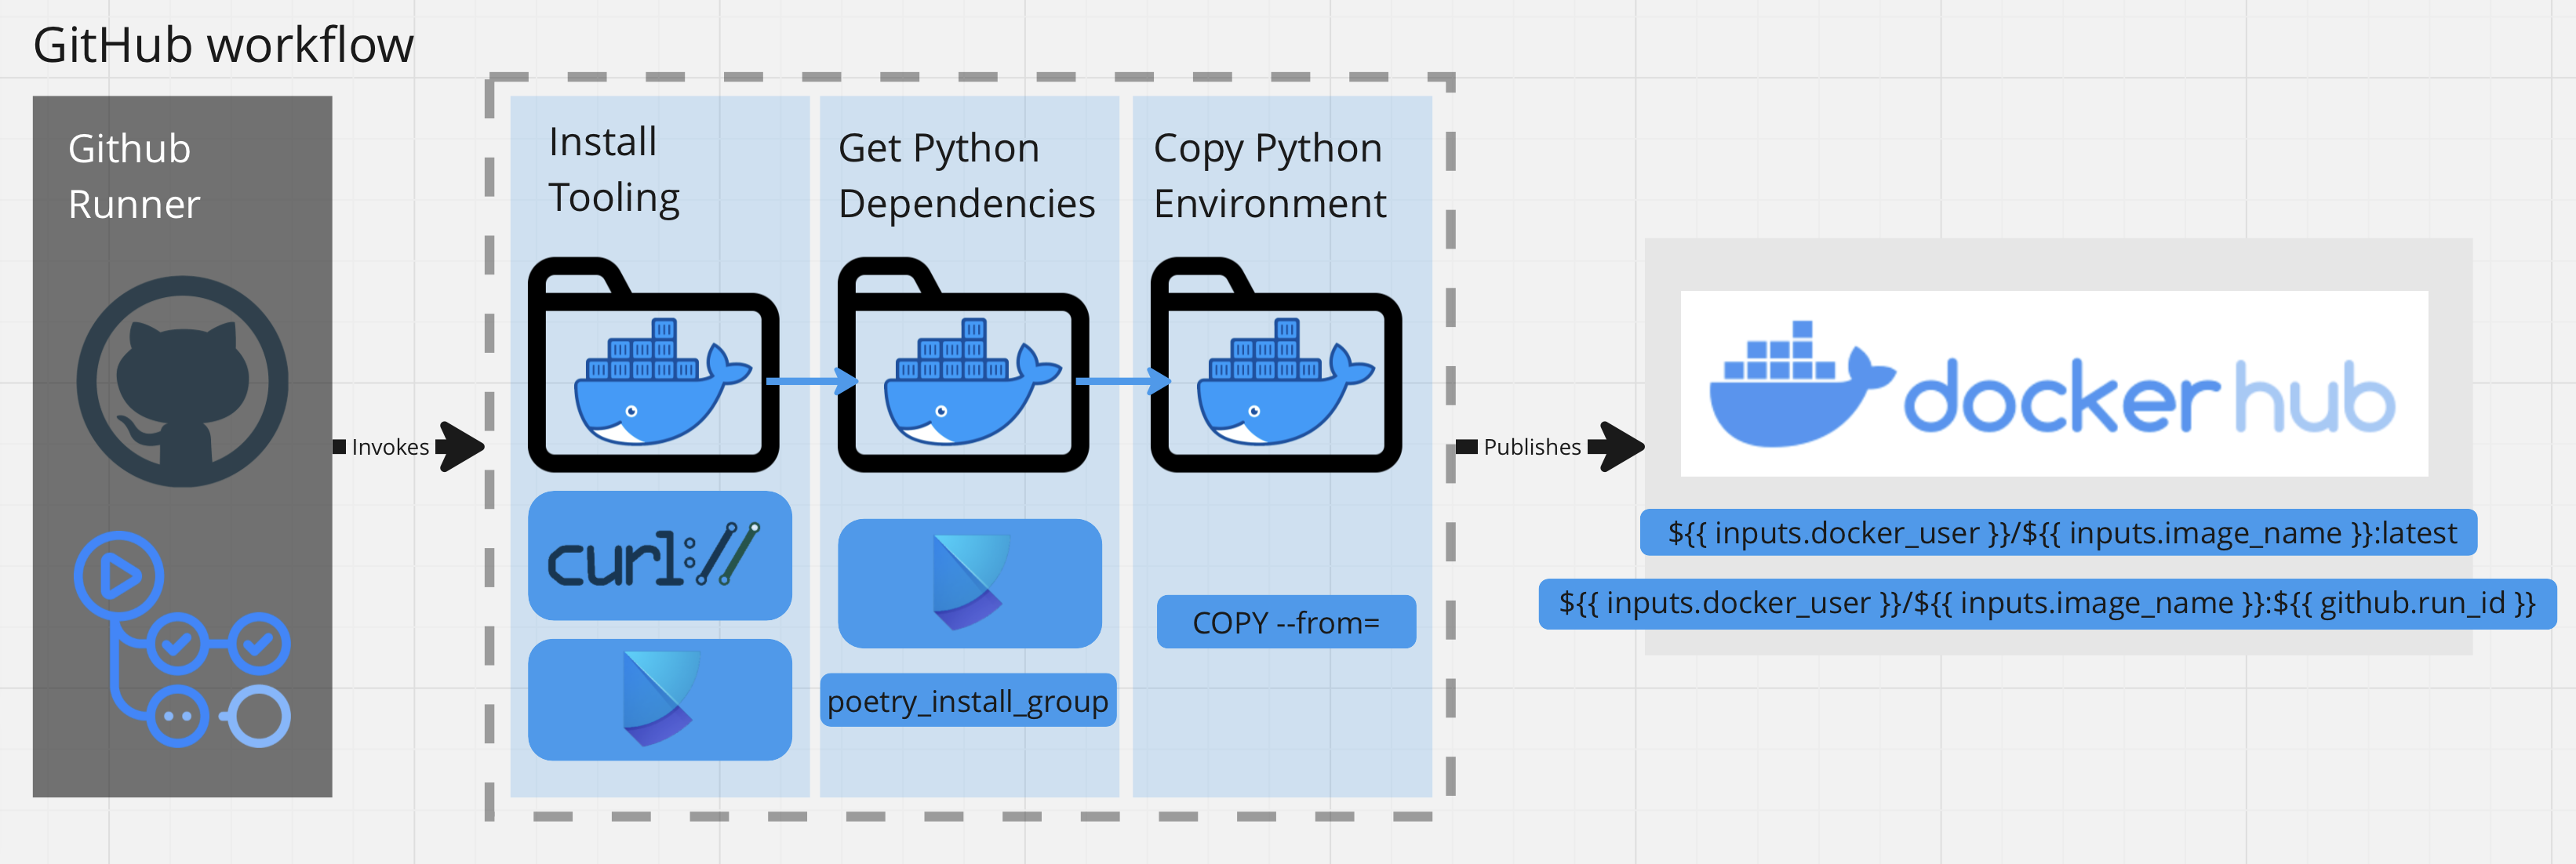
The non-functional design requirement was to decouple the Poetry dependencies into a seperate base image called alejandroarmas/jupyter-poetry-base:latest. The base image would provide the tooling required for installing python packages (ex. curl and poetry) and would be seperate from the final image.
Afterwards, I used the Multi-stage build to install the python packages from PyPi on the builder image. Since the tools were no longer neccessary in the final image, I merely copied the necessary environment files over from builder into the developement image. In addition to taking up disk space, unneeded tooling presents itself as a security risk, due to being an extra attack vector.
Dockerfile
Here are the Dockerfile syntax used for building the final developement image.
# syntax = docker/dockerfile:1.3

ARG POETRY_INSTALL_GROUP

FROM alejandroarmas/jupyter-poetry-base:latest as builder


COPY pyproject.toml ./
RUN poetry install --with "${POETRY_INSTALL_GROUP}"

FROM jupyter/scipy-notebook:$JUPYTER_STACKS_TAG as developement

ENV POETRY_HOME="/opt/poetry" \
    PYSETUP_PATH='/opt/pysetup' \
    VENV_PATH='.venv' \
    VIRTUALggf_ENV='.venv'

ENV PATH "$POETRY_HOME/bin:$VENV_PATH/bin:$PATH"

WORKDIR $PYSETUP_PATH

COPY --from=builder $POETRY_HOME $POETRY_HOME
COPY --from=builder $VENV_PATH $VENV_PATH
Notice the following build argument: POETRY_INSTALL_GROUP. In conjunction with Poetry, I was able to decouple seperate python package environments. ex. --build-arg POETRY_INSTALL_GROUP=main,notebook,models will have poetry install the dependencies in each of the groups, seperated by commas.
Considering the substantial size of the data and Jupyter Notebooks, it was impractical to store them in a Docker image, particularly since the image was hosted on Dockerhub. Docker images have size limitations, and including large amounts of data within them can lead to issues with pulling, pushing, and managing the images. Therefore, I opted to use Docker-compose to fit that use case. Yo
Mounting Data into Containers with Docker-Compose
Although Docker Compose is generally used to define and manage multi-container Docker applications, I am using it slightly differently. This includes specifying the mounting of volumes.
Normally, one can use Volumes so that data can persist across container restarts. However, I’m using docker-compose, to mount my file system into the running docker containers.
I chose to store the python source in volume, as opposed to inside of the Docker Image. This approach facilitates the frequent refactoring of reusable code across various notebooks, without necessitating a rebuild of the Docker image each time.
Likewise, I am using it share the data artifacts on my host’s filesystem with the running docker containers.
services:
  cctv-metadata-notebook-server:
    image: alejandroarmas/jupyter-notebook:latest
    ports:
      - "8888:8888"
    volumes:
      - "source/notebook_name.ipynb:target/notebook_name.ipynb"
      - "data/cctv:/target/data/cctv"
Github Workflow Job
Workflows are defined in YAML a yaml file located in .github/workflows. Here the workflow activates a job to run on a github runner, triggered by changes are made to the project source code on the main branch. Our case involves rebuilding our images, each time we complete a pull request that touches the src files.
strategy:
  matrix:
    include:
      - poetry_install_group: notebook,main
        notebook_name: jupyter-notebook
      - poetry_install_group: notebook,main,models
        notebook_name: jupyter-notebook-models
steps:
  - uses: actions/checkout@v2
  - name: Login to DockerHub
    uses: docker/login-action@v2
    with:
      username: ${{ secrets.DOCKERHUB_USERNAME }}
      password: ${{ secrets.DOCKER_ACCESS_TOKEN }}
  - name: Packaging Base Jupyter Environment
    uses: ./.github/actions/docker-publish
    with:
      image_name: ${{ matrix.notebook_name }}
      docker_file_path: infrastructure/images/notebook/Dockerfile
      docker_user: ${{ secrets.DOCKERHUB_USERNAME }}
      poetry_install_group: ${{ matrix.poetry_install_group }}
The docker-publish action contains a task, used to build and push the Docker container into DockerHub.
The reason this is written in a seperate file .github/actions/ACTION_NAME/action.yml, is because we wanted to decouple and reuse this action for other kinds of workflows.
- name: Build and push
  uses: docker/build-push-action@v3
  with:
    context: .
    file: ${{ inputs.docker_file_path }}
    build-args: |
      POETRY_INSTALL_GROUP=${{ inputs.poetry_install_group}}
    push: true
    tags: |
        ${{ inputs.docker_user }}/${{ inputs.image_name }}:latest
        ${{ inputs.docker_user }}/${{ inputs.image_name }}:${{ github.run_id }}
    cache-from: type=gha
    cache-to: type=gha
We utilize a caching mechanism to significantly speed up the build process. The cache-to option tells Docker where to store the layers after they have been build. On the other hand, cache-from tells Docker where to look for layers, when building new versions of the image. If the specified cache exists, Docker will use those layers instead of rebuilding them. In this case, both options are set to type=gha, indicating that the cache should be stored in the GitHub Actions cache.
Data Transmission and Compression
Recall that I made the design decision to decouple the data from the docker image. Since the data was not embedded inside of a Docker build layer, it was instead expected to be on the host’s filesystem.
Data interfaced with code inside of the container, only by using a Docker Volume mount. This following section I will detail how I downloaded and uploaded data. In addition to that, I will describe an optimization that tackled a huge pain point for team collaboration.
Acquiring the Data
dvc remote add -d YOUR_BUCKET_ALIAS YOUR_BUCKET_URI
dvc pull
Data Size
With the initial data exploration that was performed, we found ourselves with \(35.2\) GigaBytes of data:
du -h -d 0 data/raw/csv/pems/detector
3.2G data/raw/csv/pems/detector
du -h -d 0 data/raw/csv/pems/incident
87M data/raw/csv/pems/incident
du -h -d 0 data/raw/csv/climate
32G data/raw/csv/climate
This was a relatively small dataset, but I had a personal restriction that made sharing my results difficult with others.
Slow speeds
networkQuality -v
==== SUMMARY ====
Uplink capacity: 4.056 Mbps
Downlink capacity: 24.518 Mbps
I had an internet speed of \(24.518\) Mbps. To get an idea of how long it would take to upload this dataset, I am going to convert the file sizes to the appropriate units.
Now that we have our data units appropriately referenced, lets take a look at how long an upload would take.
This was not great and extremely costly in terms of my development iteration velocity.
Data Compression Results
In order to quickly share the files with other collaborators, I decided on transforming the data into a more compressed representation. I had lots of options. I could tar -czvf the dataset and output an archive or I could look into Apache Arrow and Apache Parquet.
Choosing Between Apache Arrow and Apache Parquet
Apache Arrow and Apache Parquet both have different design goals. While Arrow is more focused on in-memory data representation, Parquet is focused on disk storage and is optimized for space and IO efficiency. I think Arrow has a place in our data pipeline, but I felt it more towards the processing stages. Since I wanted to heavily reduce disk and network costs, as well transmit data more efficiently, Parquet was the natural choice. Here are some benchmarks that guided my decision making.
Performing Data Compression
I removed some of the unused columns which resulted in a 32x decrease in size for PeMS monitoring data and a 38x decrease in size for climate data.
du -h -d 0 data/raw/parquet/pems/detector
103M data/raw/parquet/pems/detector
du -h -d 0 data/raw/parquet/pems/incident
4.0M data/raw/parquet/pems/incident
du -h -d 0 data/raw/parquet/climate
851M data/raw/parquet/climate
35.2 GBs into 951MBs was a massive improvement!
Conclusion
Creating a Dockerized environment for Jupyter Notebooks provides a consistent and reproducible framework, improving collaboration and reproducibility of scientific experimentation.
Docker is used to build the Jupyter server environment image, which can be committed to an artifact store such as DockerHub, allowing anyone within an organization to pull it down and run it. This approach significantly boosts the sharing and reproducing of scientific experiments, leading to quicker feedback and improved understanding within teams. DVC enables one to download data artifacts, hosted on S3, and Docker Compose for mounting the file system into the running container for quick iteration. The use of GitHub Workflow automation streamlines this process.
The next part of this blog post concerns itself with data governance. That is setting up identities and authentication, in order to allow certain users the priveledge of working with the data. Go ahead and check out Part 2 where I explain how I set up Identity Access Management (IAM) on AWS using Terraform.